Tuesday, August 2, 2011

Wiring Nightmares

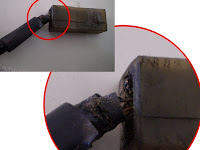
Fusible Link 90% fused
 I know we all hate to have someone critique our hard work after-the-fact.  But after 40 years of a-hacking, the wiring on this 'ole Z has seen better days.

First is the fusible link.  It was held on with two remaining strands.  I'm not kidding, I counted them both.  Pulling back the black jacket showed someone had overlapped-and-soldered the link back together.
So much for safety.   A vote to keep our local fire departments employed.


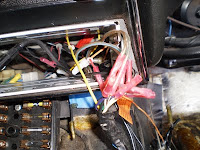
Alarm System wiring From Hell
 Above the drivers feet was a mass of wires going into a golf-ball sized wad of electrical tape.  Tugging and pulling yielded an alarm system sorta jammed up under the dash.  more splices and butt joints than you could shake a soldering iron at.  I HATE BUTT JOINT SPLICES.  Lazy.


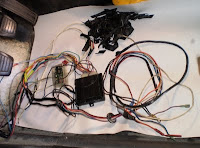
Alarm System Removed
 Here's an image of the mass-o-wires and electrical tape that was the alarm system.  Nice system, still works, I'll re-install it with 30 fewer pounds of crap.


Butt-Joint-Fiesta radio wiring harness
My other un-favorite is the clump-o-butt-joints that was the radio harness.  I wonder how the radio ever fit.

NO BUTT JOINTS.  I prefer a modified "Western Union" solder joint.
You can find an excellent tutorial here on how to solder wires properly.

Engine before-and-after


New Website

Please check out my new website woodworkerb.com

The engine was terribly greasy and dirty as would be expected.
A can of Gunk and a trip to the local self-serve car wash took off 80% of the crap.  Underneath the protective layer of grime the engine was in excellent condition.  No wear on the cylinder walls, no 'loose parts' in the oil pan.  Casting (freeze) plugs all solid and not leaking.


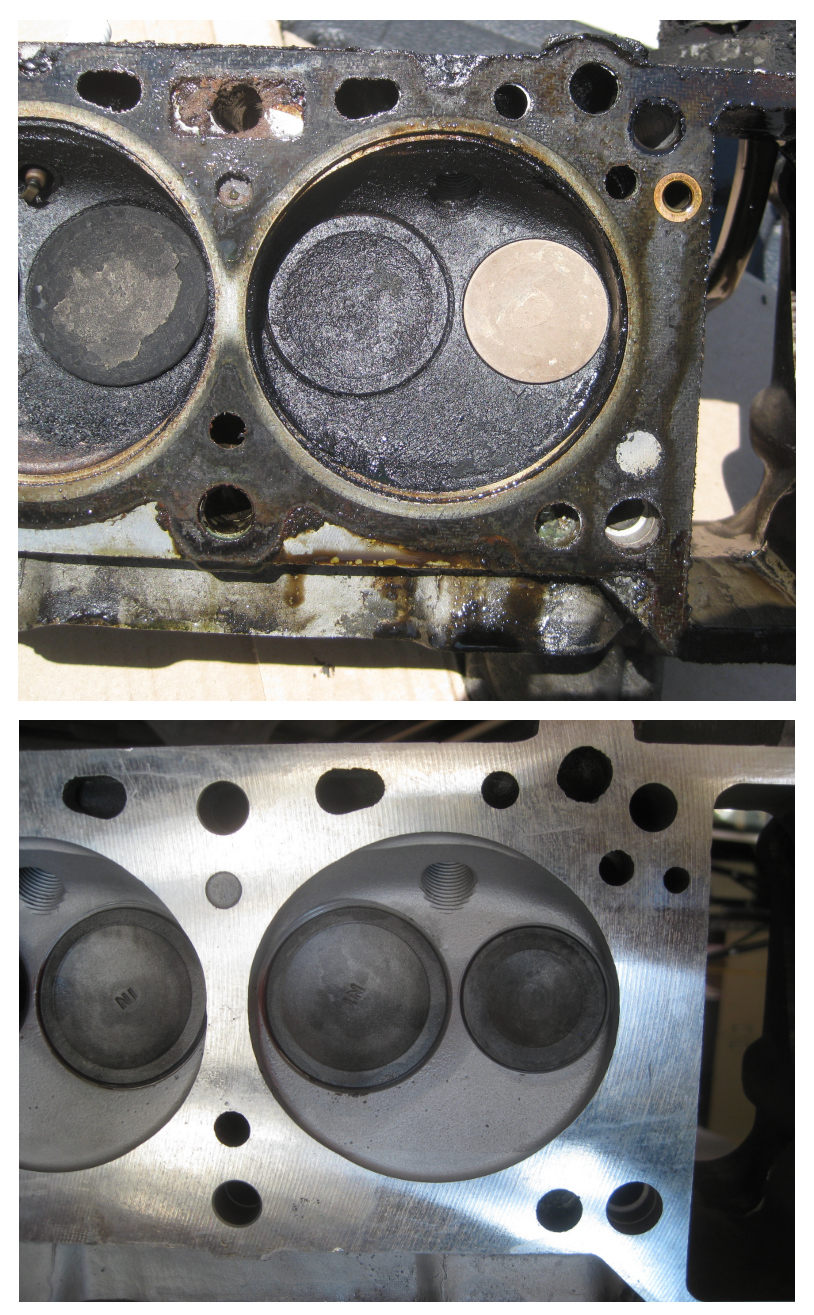
New gaskets all-around.  Sandblast the block, some paint and all is pretty

UPDATE:
What I didn't do at this point but I should have was to replace the front and rear main seals.  It is so easy to do the front seal when I took out the engine later on. The front seal was hard and brittle and was leaking pretty bad.

Slip out the old, slip in the new.  Good as gold.

Still need to do the rear seal . . . next time the engine or tranny needs to come out.  Till then, a little leaking is to be expected from a 40 year old!

Friday, July 1, 2011

And so it begins

New Website

Please check out my new website woodworkerb.com

Now it gets ugly.  Pulled the carbs, smog equipment, intake manifolds, exhaust header.  Every bolt and nut came out too nicely.  Until the last two.  One was stuck - could move back-and-forth a bit with vice-grips, the other stud (behind / below distributor) was already broken off.  At my neighbors urging, I elected to go with Metal Disintegrator Machining (MDM) through Jerry's Broken Drill and Tap Removal in Santa Ana California.  Glad I did - turns out someone already broke an EZ-Out in the other broken stud.  Both studs were removed and threaded inserts were placed.  $140 more to the tab, but beautiful results with zero damage to the head.

While it was out, I brought the head to Bob McKray Performance for cleaning and inspection.  Head was in excellent shape.  Manifold/header mounting area was .008" out-of-flat which was machined flat.  Valve seats re-ground.  Sandblasted clean - it is a thing of beauty.

Cylinder Head Before-and-After
Cylinder 1
Before-and-After

Thursday, June 30, 2011

Old pressure plate / clutch
With some gentle force with a pry bar, I was finally able to get the transmission away from the block.  A heavy dousing with Gunk engine degreaser and a trip to the local self-serve car wash, and the tranny was pretty clean.


Damaged pressure plate
The throwout bearing was in pretty good shape, but the clutch disk was to the rivets.  No damage to the flywheel, but the pressure plate was trash.  Had to borrow a pilot bushing removal tool from a local auto parts store and in 45 seconds the pilot bearing was out.  New clutch, pressure plate, throw out bearing and pilot bushing.


New pressure plate / clutch
It took about an hour of aligning, pushing and shoving to get the tranny back onto the engine.  I also added a stainless steel braided clutch hose. 

Wednesday, June 15, 2011

A new hobby

Click for larger view
I have just added a 1971 Datsun 240 Z to my project list.  I finally have the time, space, tools, money and an understanding wife that allow me to have a hobby car.  It appears to be in excellent condition - though not fully stock.  I was able to drive it home.  Closer inspection shows the body of the car to be solid, very little rust (in all the standard places), no accident damage.  Dealer-installed air conditioning.  L26 engine.  280Z hood.  Appears to have been well cared-for and no significant modifications.

I joined a local Z-owners club (Group Z).  The first meeting was already worth the $45 membership fee.  Their passion for the Z family of cars is pretty intense.  I spent an hour with one member looking over photos of the engine, underside, interior, and he gave me outstanding guidance on how to best enjoy this car.

The Plan:
  • New clutch, pressure plate, throwout bearing (badly needed)
  • Drilled, slotted front disk rotors (stock calipers OK) and new pads
  • Stainless Steel braided brake lines
  • Complete flush of brake and clutch hydraulic fluid
  • Replace all the old rubber bushings with new urethane bushings
  • Replace the stock exhaust system (6 to 1 header with 2.5" matching exhaust system)
  • New wheels and tires
  • Drive the car, enjoy it, let the car tell me what it needs next.
I will take lots of photos as I go along.